Screenshots can be a very useful way to store and share what is on your computer’s screen. Here are a few different ways to take screenshots in Windows. The snipped image is then opened within the Snipping Tool, but is also copied to the Windows clipboard for use in other applications. In the box that pops up, change the “Save As Type” to PNG or JPG, and type in a filename for your image. Choose a place to save, like the Desktop, and click Save.
- That’s one of the few reasons why people take screenshots on their computers.
- If you have more than one monitor, it will take a screenshot of everything on all the screens.
- In such cases your only option would be to use a third-party application.
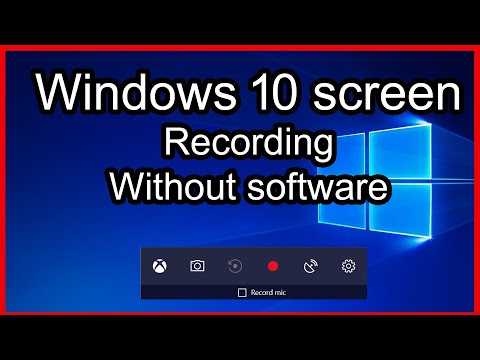
You can’t choose a different destination folder for recordings, but you can pick a quality setting, decide whether or not to record audio, and set a maximum clip length. With timed comments, you can interpret and clarify specific points, tag team members directly, and receive precise feedback. The best screen recorder tool to record and share high-quality screen recordings in Windows 10. MacOS Catalina is a screen recorder for Mac that allows users to capture tools that allow screen recording. On Windows 10, Microsoft pre-installed the Xbox App, which has a built-in screen recorder that’s designed for recording video games on your computer. You can still use it to record your screen for marketing purposes, though.
Apowersoft Screen Recorder
Click the Capture button in Snagit or Press PrtScn . One of the best parts of capturing your screen with Snagit is that you can show people exactly what you see on your desktop. On external keyboards, you’ll find a dedicated PrtScn key located in the upper-right corner.
Select an image file to convert to JPG, and click the Open button. Right-click a PNG image there and select the Rename option. This makes it handy for faster sharing and is perfect for people who often share across different apps. One of its best features is its ability to share across many platforms and social media. The app is by far a great replacement to Snipping Tool with a wider feature range and continuous upgrades from user feedback. Save your screenshot by clicking on the floppy icon.
Vietnam Times
This tutorial will teach you the basics of taking screenshots on your Windows laptop. Now that you have a copy of your screen, you must go to Word, or wherever you need the image copied (e.g. Google Docs, Microsoft Office, etc.), and paste it into the document. This can be done by tapping the touchpad with two fingers at once, and finding “Paste” on the dropdown menu that appears. The screen will dim and the mouse pointer will change.
This is most common on old computers on which you upgraded to Windows 10. Once you’ve taken your screenshot, http://driversol.com/articles/ it’ll be copied to your clipboard so you can share it right away. And if you click the preview that pops up in the bottom-right corner of your screen, you’ll be able to save and edit it. Windows 10’s Snip & Sketch is the best way to screenshot on Windows if you’re looking to customize, annotate, or share your screen captures.